Part 3. Antique Edison Phonograph Repair.
SEE ALSO: EDISON AMBEROLA REPAIR
(Outside horn machines)
A lot of repair is really simple maintenance, like lubricating the bushings, keeping things clean, and keeping a little free play in moving components. You'll be surprised how much better your machine runs by just doing this much. I'm going to discuss a few common repairs, and a few problem areas related to specific models. Then, since the reproducer is the heart of your machine, I'm going to talk a little about reproducer repair. If you want to know where to get parts, please refer to the relevant section of the Antique Phonograph FAQ.
Belting the machine
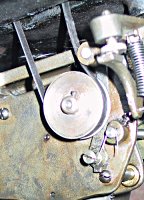 Slipping belt under tensioner |
Belting should be a supple leather. Measure the strip of new belting by wrapping it around the upper and lower pulleys and then leave yourself a little slack. Bevel the edges of the belt with a blade and glue with cyanoacrylate gel (crazy glue gel). Every machine but the Triumph was designed to work with a tensioner. Slip the new belt under the tensioner and over the pulleys. The Triumph was tensioned by dropping the height of the motor.
Adjusting the speed
 Home speed control |
Most model A machines put the speed control in plain sight, but later Homes and Standards hid the speed control under the bedplate. In theory, two minute records were supposed to run at 120rpm and four minute records at 160rpm, but in real life there was some variance, most particularly for early two minute records. If the speed on your antique Edison phonograph seems to be erratic, see the section below on Adjusting the Governor.
Adjusting the governor
 Edison governor |
Caution: run down the mainspring before playing with the governor. The governor assembly consists of (1) a governor shaft, and (2) a collar with three tiny springs, each with a lead ball in the middle. A lot of times the springs break, or the weights fling themselves into the cabinet in a desperate attempt to set themselves free. It takes good eyesight and a steady hand, and a great deal of swearing, to replace the weights and springs, but it eventually can be done. Be sure to replace the springs and weights in matched sets.
If you've adjusted the speed as much as you can and your machine still seems to be running way too fast or way too slow it may mean that some prior owner has been mucking around with the governor; you may have to loosen the governor collar and move the collar slightly up or down the shaft. There should be just the slightest amount of free play on the governor shaft.
Broken mainspring
I'm not going to tell you how to replace a broken mainspring on an antique Edison phonograph; I'm worried that the mainspring is going to fly out and pop you in the jaw. However, a mainspring off its arbor produces the same symptoms as a broken mainspring, and believe it or not, you will find the mainspring off its arbor as often as you will find the mainspring broken. You have to separate the barrel from the gear box to get to the spring barrel, but the process is quite straightforward on Standards, Homes and Firesides. Just unscrew the four screws that hold the gearbox to the frame. There should be a tiny brass bushing between the spring barrel and the gearbox. Don't lose this bushing! Pry the cover off the spring barrel, and re-form the end of the mainspring with a pliers so it will securely snag the arbor. It will take several tries. I don't recommend that you disassemble a Triumph motor to this extent because you will have to worry about hooking up three mainsprings.
Mainspring doesn't play through entire record
Usually a mainspring doesn't go wobbly on you like this, so I'd look for another cause, but it is possible for the spring to crystallize with age. Some machines were just underpowered when they came out of the factory, the particular culprits being most Gem models and any Home model that needs to push through the resistance of Combination gearing.
Feed screw doesn't advance the carriage (record repeats itself)
 Standard half nut |
The half nut is the component that engages the feed screw. Sometimes the half nut had an adjustment screw, and sometimes the half nut was tensioned by bending the assembly it was secured to. Edison said that there should be the thickness of one sheet of writing paper between the carriage and the ledge (the straight edge that the carriage rides upon). This means that the half nut should kiss the feed screw-- not French kiss, not just kiss, but kiss.
Assuming that the half nut is tensioned properly and the carriage still doesn't advance, you are left with two possibilities. A worn half nut or a worn feed screw. The feed screws on the Home model and on the Triumph were finely cut and exposed naked, a couple of fine dings could be sufficient to snarl the half nut, not to mention a little rust. Try cleaning the dirt out of the feed screw with a blade. The parts suppliers will sell you a new half nut. They may sell you a feed screw off a parts machine also, but it will cost more money than the half nut. I've seen people sell a die to rethread the Home feed screw, but I don't know how well it works. I've also seen people place an accessory half nut side by side the original. Before you spend money on new components there's one final adjustment you can make: unscrew the half nut slightly and slide it backward or forwards a little. Screw it down again and see if the machine will play through an entire record.
Mandrel doesn't rotate, or rotates grudgingly
Scenario one: Firesides and late Gems. Run down the motor. Unscrew the little collar at the end of the mandrel shaft. Unclip the mandrel and clean the mandrel shaft.
Scenario two: Factory Combination Homes, Standards, and Triumphs. Bad news, you probably have a frozen mandrel bearing. Examine the cast iron housing to the left of the mandrel, you will probably see a pot metal bearing that has cracked and swollen with age. You have to remove the old bearing and replace it with a new one from the parts supplier, and you will probably have to work around the mandrel shaft, which will be locked in with a death grip. I've seen people chip the bearings out with a screwdriver and I've heard of people extracting them with some sort of automotive puller. When I get extremely frustrated I torch them out by heating the rear of the housing, but I don't recommend this and you didn't read it here. Whatever you do, be careful not to bend the mandrel shaft. Some of the replacement bearings I've received didn't work well until I polished them.
Reproducer repair
 Hinge block still in |
 Rings and diaphram |
Antique Edison phonographs used a jeweled stylus, saphire or diamond. Although you can rotate the stylus on a C reproducer it's usually easier to purchase a new stylus mounted in a bar and replace the whole assembly. The instructions and pictures here are for the C reproducer, but most other reproducers aren't that different. You'll need some fine screwdrivers, a fine needle-nose pliers, a little bucket to contain small parts, and a large pan of some sort to work over so that you don't drop anything on the floor.
1. Unscrew the stylus at the fulcrum.
2. Unscrew the adjusting pin that extends through the limiter loop. Do not bend the limiter loop.
3. Unscrew the tail of the reproducer at the hinge pin block.
4. Unscrew the hold-down ring. There was originally a special spanner to do this, but you can do it by carefully pushing with a screwdriver.
5. Pop out the tabbed metal ring. Note the alignment of the the diaphram vis-a-vis the shell of the reproducer; the arbor should be at a 90 degree angle to the lettering. Remove and clean the diaphram. Remove and clean out the old gasketing. You can purchase a new set of rubber gaskets from the parts supplier; they will only cost around twenty cents.
6. If you didn't get a wire for the linkage you can bend a staple to form a hook on each end; the total length should be approximately 3/8".
7. Replace the diaphram and gaskets.
8. Pop in the tabbed ring.
9. Screw in the hold-down ring.
10. Hook the linkage to the diaphram, if you haven't already done so. The other end of the linkage should be hooked to the bar.
11. Screw in the hinge pin block.
12. Here's the trick to getting the bar back in place: dangle the bar through the hole in the center of the fish tail.
13. Flip the bar into place and screw it in the fulcrum.
14. Slide the adjusting pin through the limiter loop and screw it in.
BACK: PART TWO. ANTIQUE EDISON PHONOGRAPH MODEL IDENTIFICATION
BACK: PART ONE. EDISON PHONOGRAPH BEGINNER'S GUIDE
Copyright 2006 Lynn Bilton
 For Sales